Secure Email Configuration -Apple Mail POP for MacOS X
Secure Domain Email Customers: If your secure email account with us uses a domain name other than 4securemail.com, simply use your domain instead of 4securemail.com wherever it appears in the instructions or the examples given. If you have purchased your own IP address & certificate, you may substitute any reference of mail.4securemail.com with your mail host name, e.g. mail.yourdomain.com.
- Step 1: Create your Email Account
- Step 2: Account Information
- Step 3: SMTP Server Options
- Step 4: Advanced Configuration
- Manufacturer Technical Support
Overview
This document will help you to configure your Apple Mail (built-in MacOS X software) Email client to work with the mail.4securemail.com Secure Email Hosting system.
Compatible MacOS versions: OS 10.2.x (Jaguar), 10.3.2 or higher (Panther)
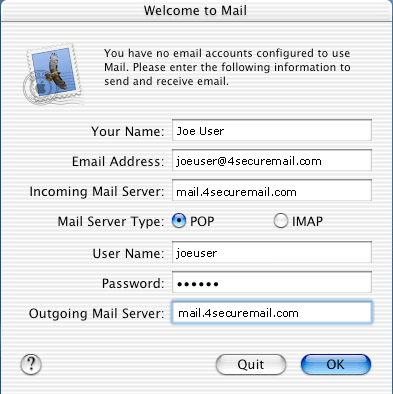
Step 1: Create your Secure Email Account
- Start Mail.
- If it is the first time you are setting up your account, a wizard will walk you through the steps.
- Fill out the following information:
- Your Name: The name you wish to have displayed when sending Email
- Email Address: Your 4SecureMail Email address
- Incoming Mail Server: Type mail.4securemail.com
- Mail Server Type: Select "POP"
- User Name: Your user ID (ie: joeuser)
- Password: Your Email password
- Outgoing Mail Server: Type mail.4securemail.com
Your settings should be similar to the following:
Step 2: Account Information
- Select the "Mail" pulldown menu and click on "Preferences."
- The "Description" field can be any name you choose for your account (ie: Work Mail)
- The "Email Address" is your 4SecureMail username@4SecureMail.com (ie: joeuser@4SecureMail.com)
- Enter the name you wish to have displayed when sending Email in the "Full Name" field.
- "Incoming Mail server" should be filled, as well as "Outgoing Mail server."
- Click on the "Options" button.

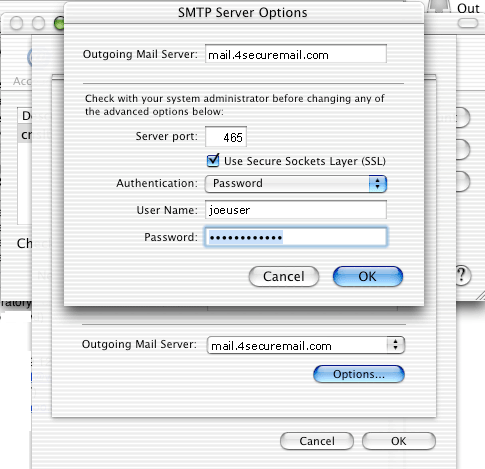
Step 3: SMTP Server Options
- Make sure that "Use Secure Sockets Layer (SSL)" is checked.
- Make sure that 465 is entered in the "Server port" text field.
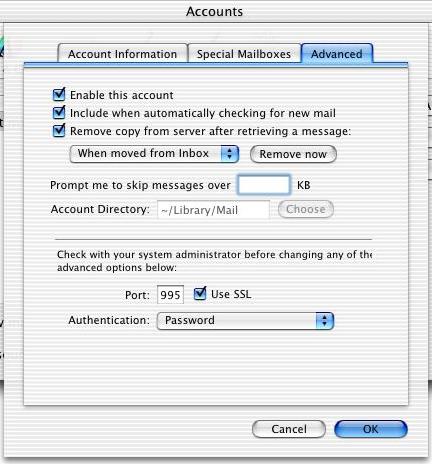
Step 4: Advanced Configuration
- Click on the "Advanced" tab.
- In the upper section:
- Although it is not required, we recommend that you check the "Remove copy from server after retrieving a message" as well as the selection "When moved from Inbox" in the list below the checkbox.
- This will allow you to check your mail from other locations, as not selecting the "When moved from Inbox" will tell Apple Mail to delete the messages on the server immediately upon viewing your mail.
- NOTE: both selections will allow you to view your mail on the computer with Apple Mail set up.
- In the lower section:
- make sure the "Use SSL" checkbox next to the "Port" text field is checked.
- Make sure that the "Authentication Style" is "Password"
- Click "OK" when you are finished.
- You should now be able to send and receive mail.
Manufacturer Technical Support
For technical support from Apple, please visit https://www.apple.com/support/panther/mail/.
|
