Secure Email Configuration Eudora Macintosh

Secure Email Configuration Eudora Macintosh |
| Secure Email Home | Secure Email Configuration Home |
|
|
Secure Email Service - Configuration -Eudora POP/IMAP for MacOS 10.2.xSecure Domain Email Customers: If your secure email account with us uses a domain name other than 4securemail.com, simply use your domain instead of 4securemail.com wherever it appears in the instructions or the examples given. If you have purchased your own IP address & certificate, you may substitute any reference of mail.4securemail.com with your mail host name, e.g. mail.yourdomain.com.
This document will help you to configure your compatible Eudora Email client for a secure email account.
Compatible Eudora versions: 5.21, 6.02 or later
The directions below assume a new secure email setup of Eudora with a single account ("Personality"). Users with non-working existing accounts may need to reconfigure Eudora to allow it to use the System Keychain. You may also need to edit the System Keychain in order for Eudora to work properly. Click here for more information on using Eudora POP secure email. Step 1: Start Eudora (Part 1)
1. Open Eudora.
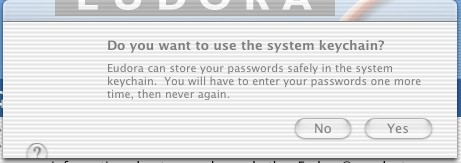
IMPORTANT: You must allow Eudora to use the Keychain for storing the SSL certificate, or your mail.4securemail.com account will not work.
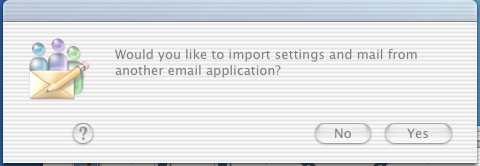
Step 2: Start Eudora (Part 2) Click "No" when prompted to import settings from other applications.
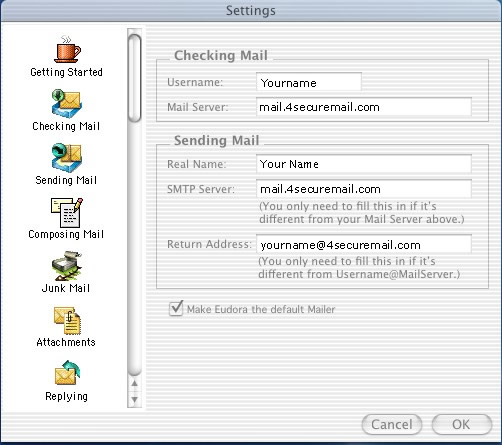
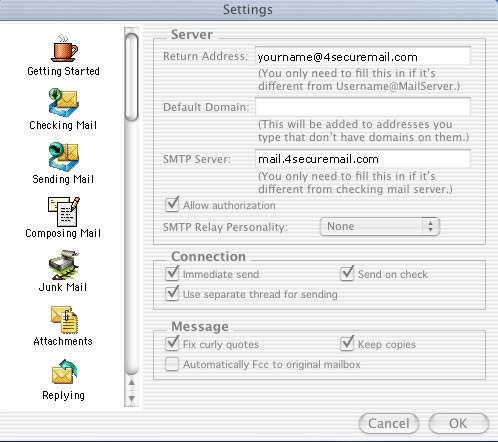
Step 3: Getting Started Configuration The "Settings" box opens with the "Getting Started" menu selected. Enter the information as listed in the screenshot below, changing "yourname" to your user name under "Username" and "Return Address", and "Your Name" to your name under "Real Name."
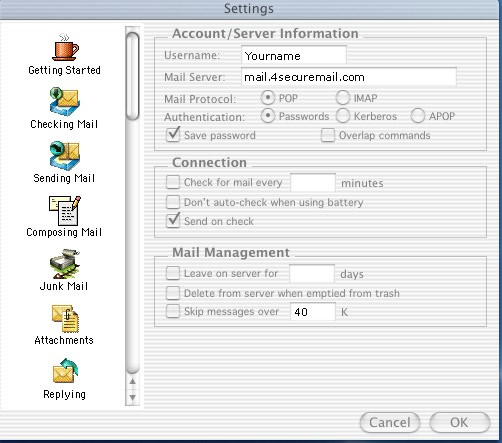
Step 4: Checking Secure Mail Configuration Click on "Checking Mail" in the left-hand column. Verify that "mail.4securemail.com" (no quotes) is listed under "Mail Host." There are two choices for your Incoming server: POP and IMAP. If you are unsure as to which one you want to have, choose POP.
Step 5: Sending Secure Email Configuration Click on "Sending Mail" in the left-hand column. Verify that "mail.4securemail.com" is listed under "SMTP Server," and "Allow authorization" is checked.
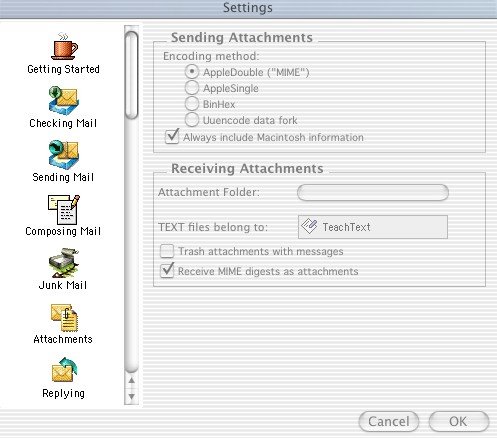
Step 6: Attachments Configuration Click on "Attachments" in the left-hand column. Verify that "AppleDouble ("MIME")" is set under "Encoding method," and that "Always include Macintosh information" is checked.
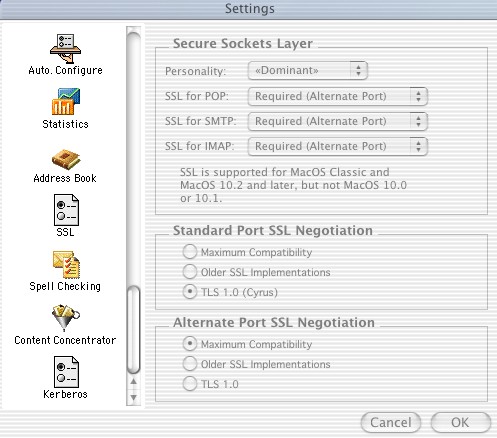
Step 7: SSL Email Configuration Click on "SSL" from the left-hand column (you may need to scroll down). IMPORTANT: version 5.21 users should note that the screenshot shown is from version 6.02; the image you will see in 5.21 will look slightly different. (version 5.21 only): Set "Secure Sockets Layer" to "Required (Alternate Port)" for all options (version 6.02 only): Set "Secure Sockets Layer" to "Required (Alternate Port)" for all options, and Alternate Port SSL Negotiation to "Maximum Compatibility"
Click "OK"
Step 8: Keychain Creation (Part 1) **The remaining instructions apply to creating a Secure Email System Keychain only; you may need to check email again, once the Keychain has been created. Refer to the Help Center pulldown menu for more info from Apple on the System Keychain.** Enter your email password at the prompt and click "OK."
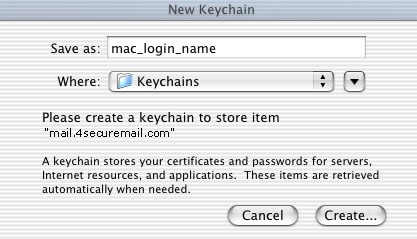
Step 9: Keychain Creation (Part 2) New Keychain screen: you are prompted to create a keychain for passwords and certificates. The default keychain name in "Save as" is the same as the account you logged into your computer with. Click "Create". IMPORTANT: you must allow Eudora to use the Keychain for storing the SSL certificate, or your mail.4securemail.com account will not work.
Step 10: Secure Keychain Creation (Part 3) New Keychain Passphrase screen: Enter the password or phrase you want to use for your new keychain. Once you have entered in your password, click "OK."
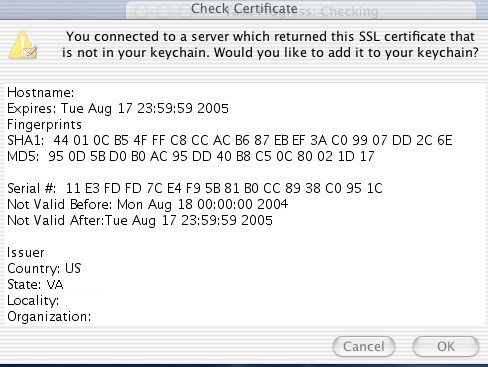
Step 11: Keychain Creation (Part 4) Check Certificate screen: the newly-created SSL Certificate is unknown to your keychain; click "Ok" to add it Quit Eudora and restart it to send and receive email. Note: though not necessary for checking your email at this point, if you would like to view your new keychain, run "Keychain Access"" (from the Finder, pulldown the "Go" menu; click on "Applications", open "Utilities" and "Keychain Access") IMPORTANT: We advise you leave the Keychain unlocked.
If you have followed these instructions and are still unable to connect properly, you may need to edit the System Keychain in order for Eudora to work properly. Manufacturer Technical Support For technical support from Eudora, please visit https://www.eudora.com/techsupport/. |
|
|
| Secure Email Home | Secure Email Configuration Home |