|
To compose and send a new secure email message, just click on the "New" icon on the top tool
bar. A new window will open. |
 |
- To - This is where you choose a recipient from the address book or type in an email address. The "To": field must be filled in before sending the message.
- Reply To Address - This is your address where the recipient may reply to your message.
This field will show your email addresses.
- CC: (Carbon Copy) - Put additional email address(s) of people to whom you wish to send a copy of the original message. Each recipient of a CC will see the email addresses in the To and CC fields.
- BCC (stands for blind carbon copy) - Similar to CC, but the e-mail addresses
of those in the BCC field will not be seen by other recipients.
- Attached - This shows if there is an attachment to the message.
- Subject - This is where you say what the message is about.
- Priority - If your message is urgent , you can set the priority to urgent. This is just for the recipient to know it is important and does not send the message any faster.
- Signature - You can include one of your signatures on your
message using the drop down.
- Content/Type - This is where you select the format of message you are sending. Use either plain text or HTML.
- Keep Copies - Check this check box if you would like a copy of this message to be kept in
your sent folder.
Recommended.
- Request Confirm - This allows you to request a receipt showing the the recipient has opened your message.
- Clear - The clear button will clear the contents of a selected field.
|
|
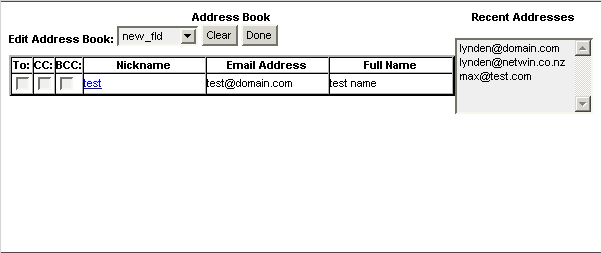
A user can select email addresses them from the Address Book or Recent Addresses instead of manually typing in the email addresses.
 Just click on the "Addresses" icon and choose which addresses you
would like to send the email to, and which fields you would like them to appear in.
Just click on the "Addresses" icon and choose which addresses you
would like to send the email to, and which fields you would like them to appear in.
To use this first select an address
and then click on the field where you wish it to go such as To, CC or BCC.
Then click on the "Done" button. This
will take you back to your message.
You can click on the "Clear" button to clear the fields.
This is also the only way of removing addresses from these fields within this screen.
If you want to remove one or more addresses but NOT all, you must click
on the Done button and then do it in the new message window.
|
 |
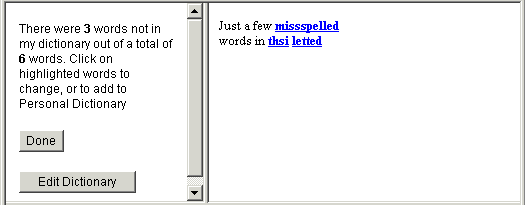
Any time during or after you have composed a message, you can have the email server run a spell check on it. |
The spelling function checks for spelling mistakes in the body text of your new message, but not the subject line or other fields.
The left hand panel tells you how many spelling mistakes were found (or words not in dictionary. The right hand panel shows the body text with the misspelled words highlighted.
To correct the words that have been spelled wrong, click on them in the right window panel.
This will take you to the 'Correct Word' screen. In here, you can select one of the
suggestions. When you have made a selection, it will be placed in the
'Change Word' field, and if you click on 'Change' it will be changed, and
take you back to the previous screen where you will see that the misspelled word has been
corrected. Due to dictionary limitations and other factors not all words will have suggested corrections.
In this case you can change the word manually by editing it in the 'Change Word' field and clicking on the
Change button.
If a word is not in the WebMail dictionary, click on the Add
button to add it to your personal dictionary.
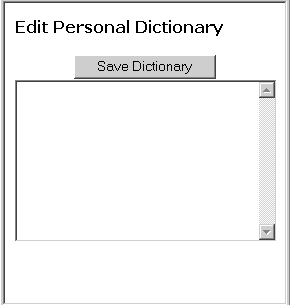
You can manually add words to your secure email server personal dictionary by clicking on the
Edit Dictionary button shown below.
This button lets you to you edit your Personal Dictionary.
Just type in the word you wish to add
in the 'Add New Word' field and then click the Save button. To delete a word from the list, just
select a word and click on 'Delete Selected'.
When you are finished, click on the Done button.
|
|
 |
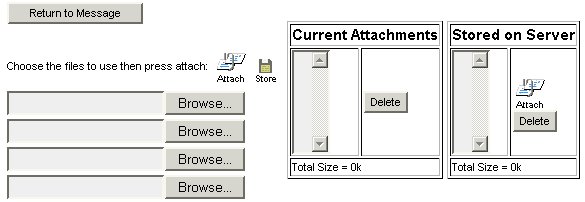
To attach documents or picture files to your message, click
on the "Attach" icon. This will open the Manage Attachments screen. |
The Browse button lets you navigate to the location of the file that you
would like to attach. After you locate the file, click on the
'Add' button to attach the file to the current message.
When the file has been attached it will appear in the Current Attachments
list. The size of the attachment will be shown in brackets beside the filename.
You can attach multiple files to the message. As additional files are selected, the size of the attachments will be shown at the bottom of the 'Current
Attachments' list.
To cancel an attached file, choose the file and click on the Delete button.
To store a file on the secure email server click on Store button.
Later, if you want to attach a stored file, select it from the
'Stored on Server' list, click the attach icon and the file will show up in 'Current
Attachments'. Stored files will remain on email server until you delete them.
Note that any stored files count towards the amount allocated storage that you have signed up for when you opened or updated you secure email hosting account.
Once you have finished attaching any files, click on the RETURN TO MESSAGE button to
finish composing or send the message.
|
|
 |
Once you have finished composing your secure email message, click on 'Send' to
send it. |
|
 |
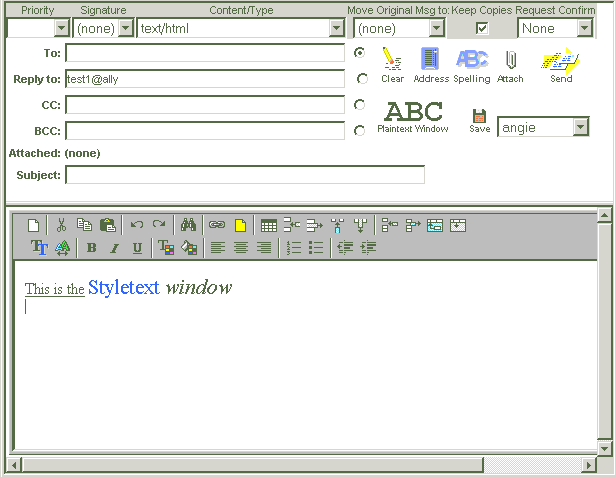
You can also compose message in the Styletext window. |
The StyleText window's toolbar lets you easily add more HTML based styles to your message. You can add color
to your text or background, use different fonts, make tables, insert links, align text, and more.
Use the tools to design your message the way you want it to look.
You can click on the Plaintext icon  to return to the regular secure email Compose screen.
|
|
 |
You can save any emails that you plan to use again, or those which
you did not have time to finish. Saving the email will store it as a draft on the secure mail server until you are ready to send it. You must select a folder from the drop-down list in which to store this
draft message.
Secure email home - 4SecureMail |
|
|
|